waveSDR
A macOS native desktop RTLSDR Software Defined Radio application.
Project maintained by getoffmyhack Hosted on GitHub Pages — Theme by mattgraham
Basic Usage
This documentation, like the application itself, is in a very early stage. Things will be constantly changing and I will attempt to keep updated and grow the documentation as I continue developing waveSDR. This documentation should also be considered incomplete.
Overview
waveSDR started as means for me to learn several new programming topics including macOS desktop application programming, Apple’s Swift language and DSP techniques. Therefore, most all UI design decisions are based off of what I feel were best suited for my usage and abilities as I learn the Cocoa frameworks. This may or may not be the best or most user friendly way of doing things, and as I continue to develop waveSDR, controls and displays may drastically change from one minor revision to another as I keep experimenting with new features. With that said, I will most likely continue with the current UI scheme, where, as described below, there will be a sidebar which will contain most of the “radio time” controls, a main section which contains the “radio display”, the “spectrum display”, and as I continue to add features, will include other displays such as a channel / memory list, and other features that I will add.
Main Window
waveSDR has several distinct UI sections which are either display areas or control areas, and in some cases, both display and control areas :). The most obvious sections are the sidebar and the main display. The sidebar has multiple sets of controls, selected via a drop down menu. The main display currently contains the “radio” view and the “spectrum” view. The radio view contains the display of the radio indications such as frequency, squelch level, current signal strength, etc. and also contains the most used controls for the overall radio. The spectrum display contains the analyzer and the spectrogram views.
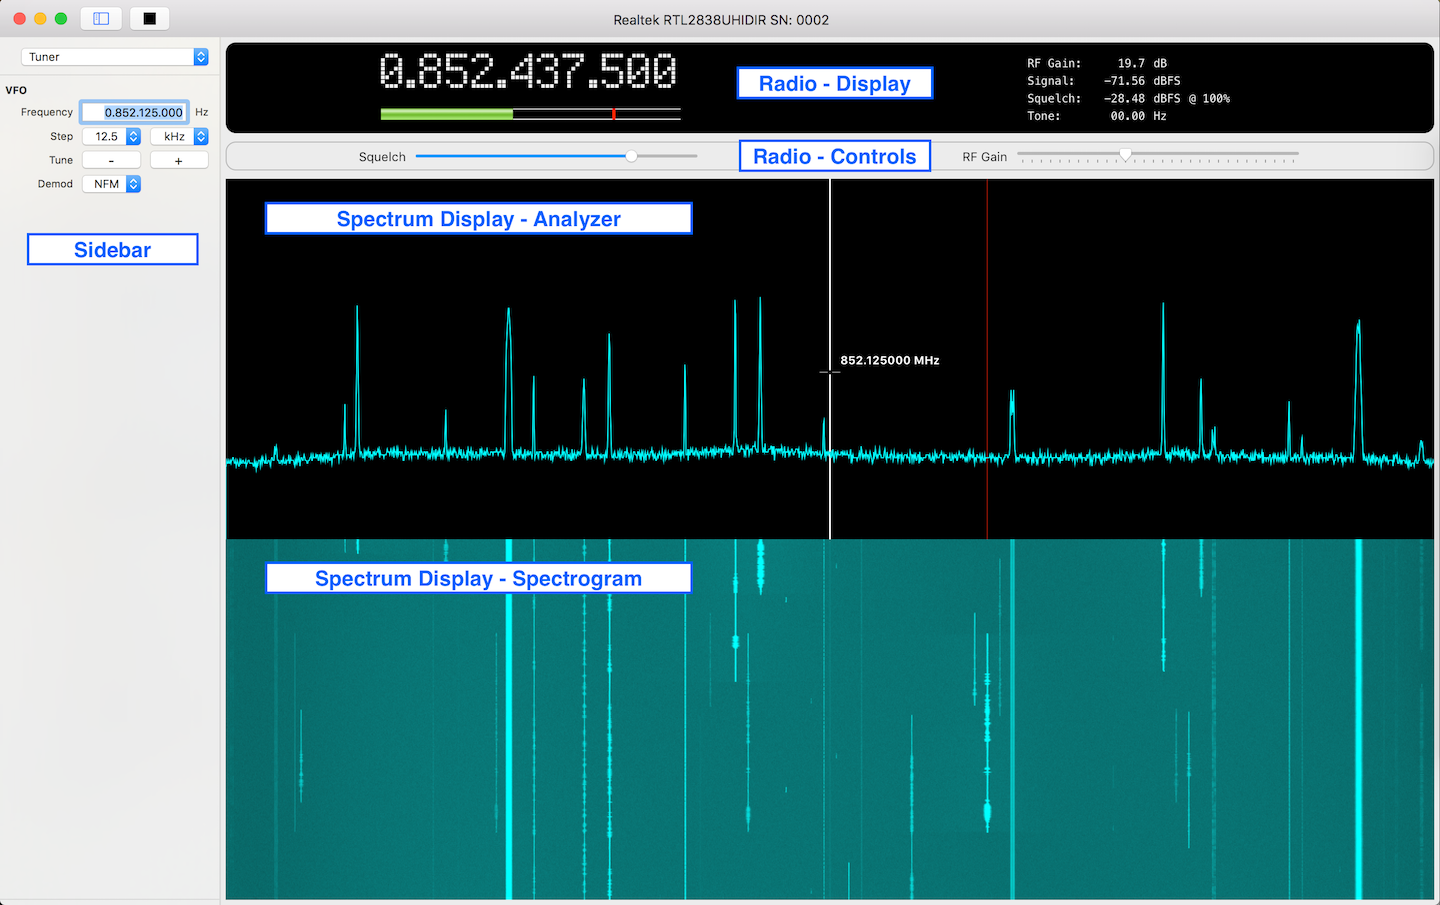
Toolbar
The toolbar contains the application controls. The first button is the standard “Hide / Show Sidebar”, while the second button starts and stops the data stream from the RTLSDR device.
Sidebar
The sidebar is where most of the controls are located, currently, there are only the most basic controls needed for operation. The sidebar controls are grouped by their functions and include Hardware controls and Tuner controls. More controls will be added in future versions such as DSP, Scanner and Audio controls, to name a few.
Hardware
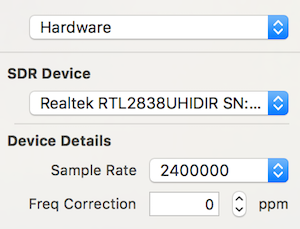
The Hardware controls are used to select the SDR Device and aspects of the device itself. Currently, waveSDR only supports the RTLSDR device, but I fully intend to add more devices as the applications matures.
Upon selecting the SDR device, the configuration options allow changing the Sample Rate and the Frequency Correction. Currently, the sample rates of 960000 and 2400000 samples per second are the only options available. This is due to limitations in my current DSP implementation, and will change in a future version. The frequency correction is passed to the RTLSDR driver and is used to “fine tune” the device.
Tuner
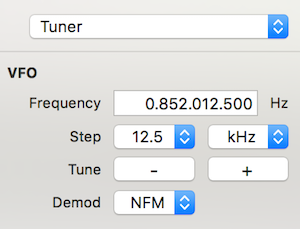
The Tuner controls are used to tune the radio to specific frequencies using the selected demod mode. Also included are controls for changing the step size and buttons for stepping through frequencies either up or down.
The Frequency input is used to change the center frequency of the SDR device. Input can be in one of two formats, the first being the raw frequency in Hertz, input without any additional characters. The frequency can also be entered by using the ‘.’ character as the thousand separater. For example, if you want to tune to 146.940 MHz, it could be entered as 146940000, or 146.940.000.
The Step control is used to adjust the change in frequency while using the Tune controls. The Step size also controls the the frequency line while the mouse is within the spectrum analyzer.
For manual step tuning, the [ - ] & [ + ] Tune buttons will either decrease or increase the frequency one Step size each click.
The Demod drop down menu allows you to select the demodulation mode, currently AM, NFM and WFM (mono) are available. More modes will be added as new features in future versions.
Main Display
waveSDR’s main display contains several sections which are mainly used for visual information along with controls for the most common functions. The uppermost section is the “Radio Display” which contains the information related to the currently tuned signal. Related to the Radio Display are the “Radio Controls”, which currently only contains the squelch and RF gain controls.
Below the Radio section is the “Spectrum Display” which includes a spectrum analyzer and a spectrogram. Both the analyzer and the spectrogram accept mouse controls as described below.
Radio Section

The Radio Section contains the display and controls that most closely resemble that which would be found on the front panel of a traditional radio. The upper section contains the visual information display related to the currently tuned signal while the lower section contains the most commonly used controls. Currently, the only controls available are the Squelch and the RF Gain. As I continue development, other controls may be added to this section.
Radio Display
The upper portion of the Radio Section contains the visual information related to the currently tuned signal. The left side displays the current tuned frequency (which may be different than the hardware frequency) as well as a signal level meter with a squelch indicator. The right side displays several details about the current signals:
- RF Gain:
- Control the RF gain value provided by the RTLSDR driver.
- Signal:
- The demodulated signal strength.
- Squelch:
- The current squelch level, with the % value indicating the percentage of samples being squelched.
- Tone:
- The CTCSS tone if detected.
Radio Controls
Just below the Radio Display, the Radio Controls contain the most often used controls. Currently, there is only the Squelch slider and RF Gain slider. The Squelch slider simply adjusts the current squelch level, where the RDF Gain slider selects one of the pre-set gain values from the RTLSDR driver. Changes in these sliders will be seen in the Radio Display section.
Spectrum Display
The spectrum display contains both the Spectrum Analyzer and the Spectrogram.
Spectrum Analyzer
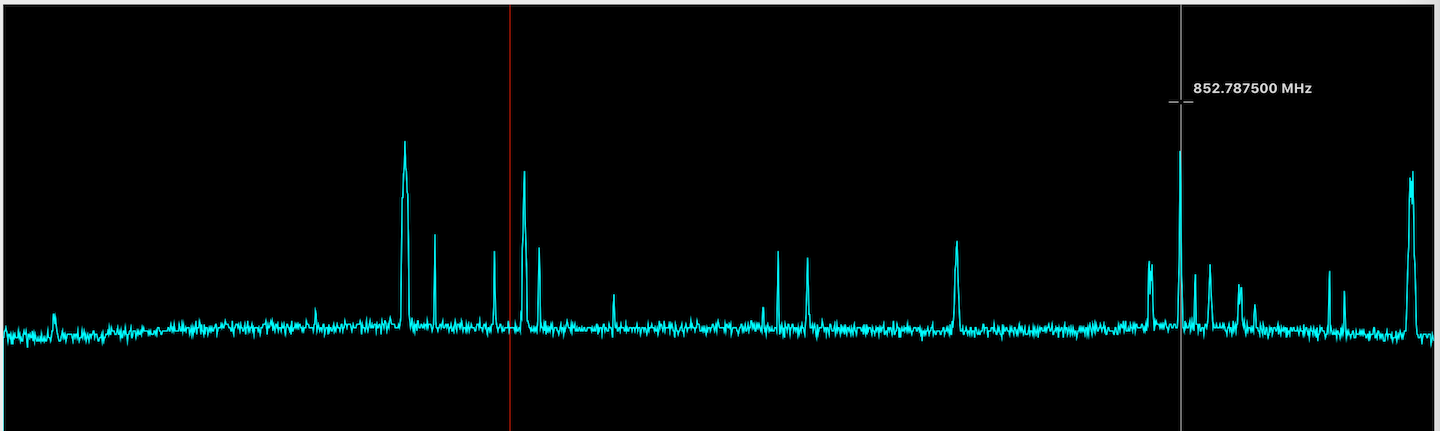
The Spectrum Analyzer displays the FFT, the location of the tuned frequency and when the mouse is inside the view, the frequency under the cursor is displayed. Their are several tuning controls also available while the mouse is within the analyzer.
The FFT is simply the output from the FFT applied to the current incoming block of samples.
The location of the tuned frequency (not necessarily the hardware frequency) in relation to the overall bandwidth is displayed as the red vertical line, this is also the frequency displayed in the Radio Display.
When the mouse enters the Spectrum Analyzer, the mouse cursor changes to a white vertical line with the frequency under the mouse displayed. While the mouse is inside the analyzer view, it will only move in increments of the Step Size, allowing for easy “channelized” tuning.
While the mouse is inside the analyzer view, clicking once will “soft” tune to the frequency under the mouse. A double click will change the center (hardware tuned) frequency to the frequency under the mouse. Tuning can also be done by swiping either left or right, with the change in frequency being the Step Size.
Spectrogram
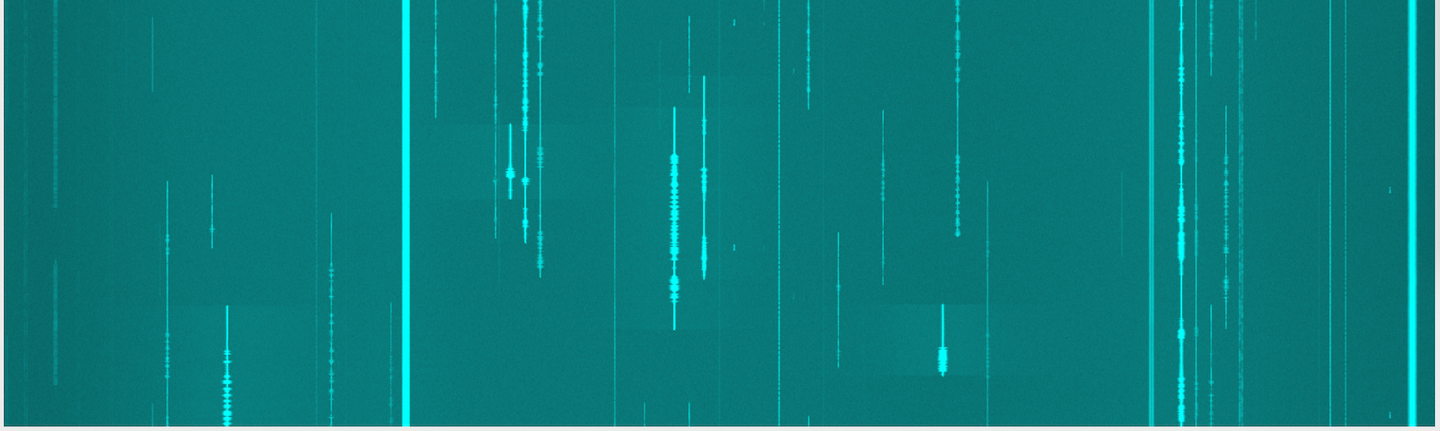
The Spectrogram displays a history of signals as it plots the FFT magnitudes versus time. At this point I want to leave a little teaser… In the Spectrogram view, there will be controls to control the “receive buffer” such that you can pause and rewind through the sample buffer… think DVR. My development branch has the starting point working of being able to pause the demod of incoming samples.